Google Map
Tuesday, Dec 31, 2024 | 4 minute read | Updated at Tuesday, Dec 31, 2024
串接Google Map 顯示聚會地點
在這篇要來介紹,如何在使用Django的框架下,設定串接Google Map
簡單的插入一個設定好地址的地圖並不難,但要接資料庫的地址來顯示,就需要做一些設定
在嘗試數次失敗,心灰意冷的時候,重新肘理思緒,更換輔助工具之後,終於成功讓頁面展現出地圖了
當地圖完整的渲染出來在頁面上,當下的心情只能說是,超~級~開~心~💞
接下來就分享我的成果給大家
串接前準備
在開始之前,我們會需要準備好下面的條件:
1.Google Map Api
Google Maps Platform
請先到Google maps官網,申請帳號後,建立專案並取得API,這部分的操作相對簡單,也很多資源介紹,暫且這邊就不贅述,後面有時間再補齊。
要注意的是,Google maps的專案,是需要綁定信用卡的,基本上在一定的使用量之內,是不需要額外付費的。除非超過使用量或是需要用到更進階的功能,才會需要付費。
好消息是,這次使用google map功能,都是在免付費的範圍。
2.安裝套件
- 在Django中是使用Python語法,而google map設定會使用的的是JavaScript語法,因此這邊會安裝打包器
esduild,將.js檔案打包後,再匯入html中。
這邊需要注意的是,雖然在一般來說在html檔裡,可以直接使用放入指令,但在Django裡的html是吃不到python or js 語法的。
npm install esbuild
- 另外,因為會使用到API KEY,我們不希望顯示在前端被其他人玩爆😐,所以要將KEY放在環境變數中,這時候會需要套件
python-dotenv去讀取,如果已經有安裝的這邊可以略過,
poetry add python-dotenv
小測試
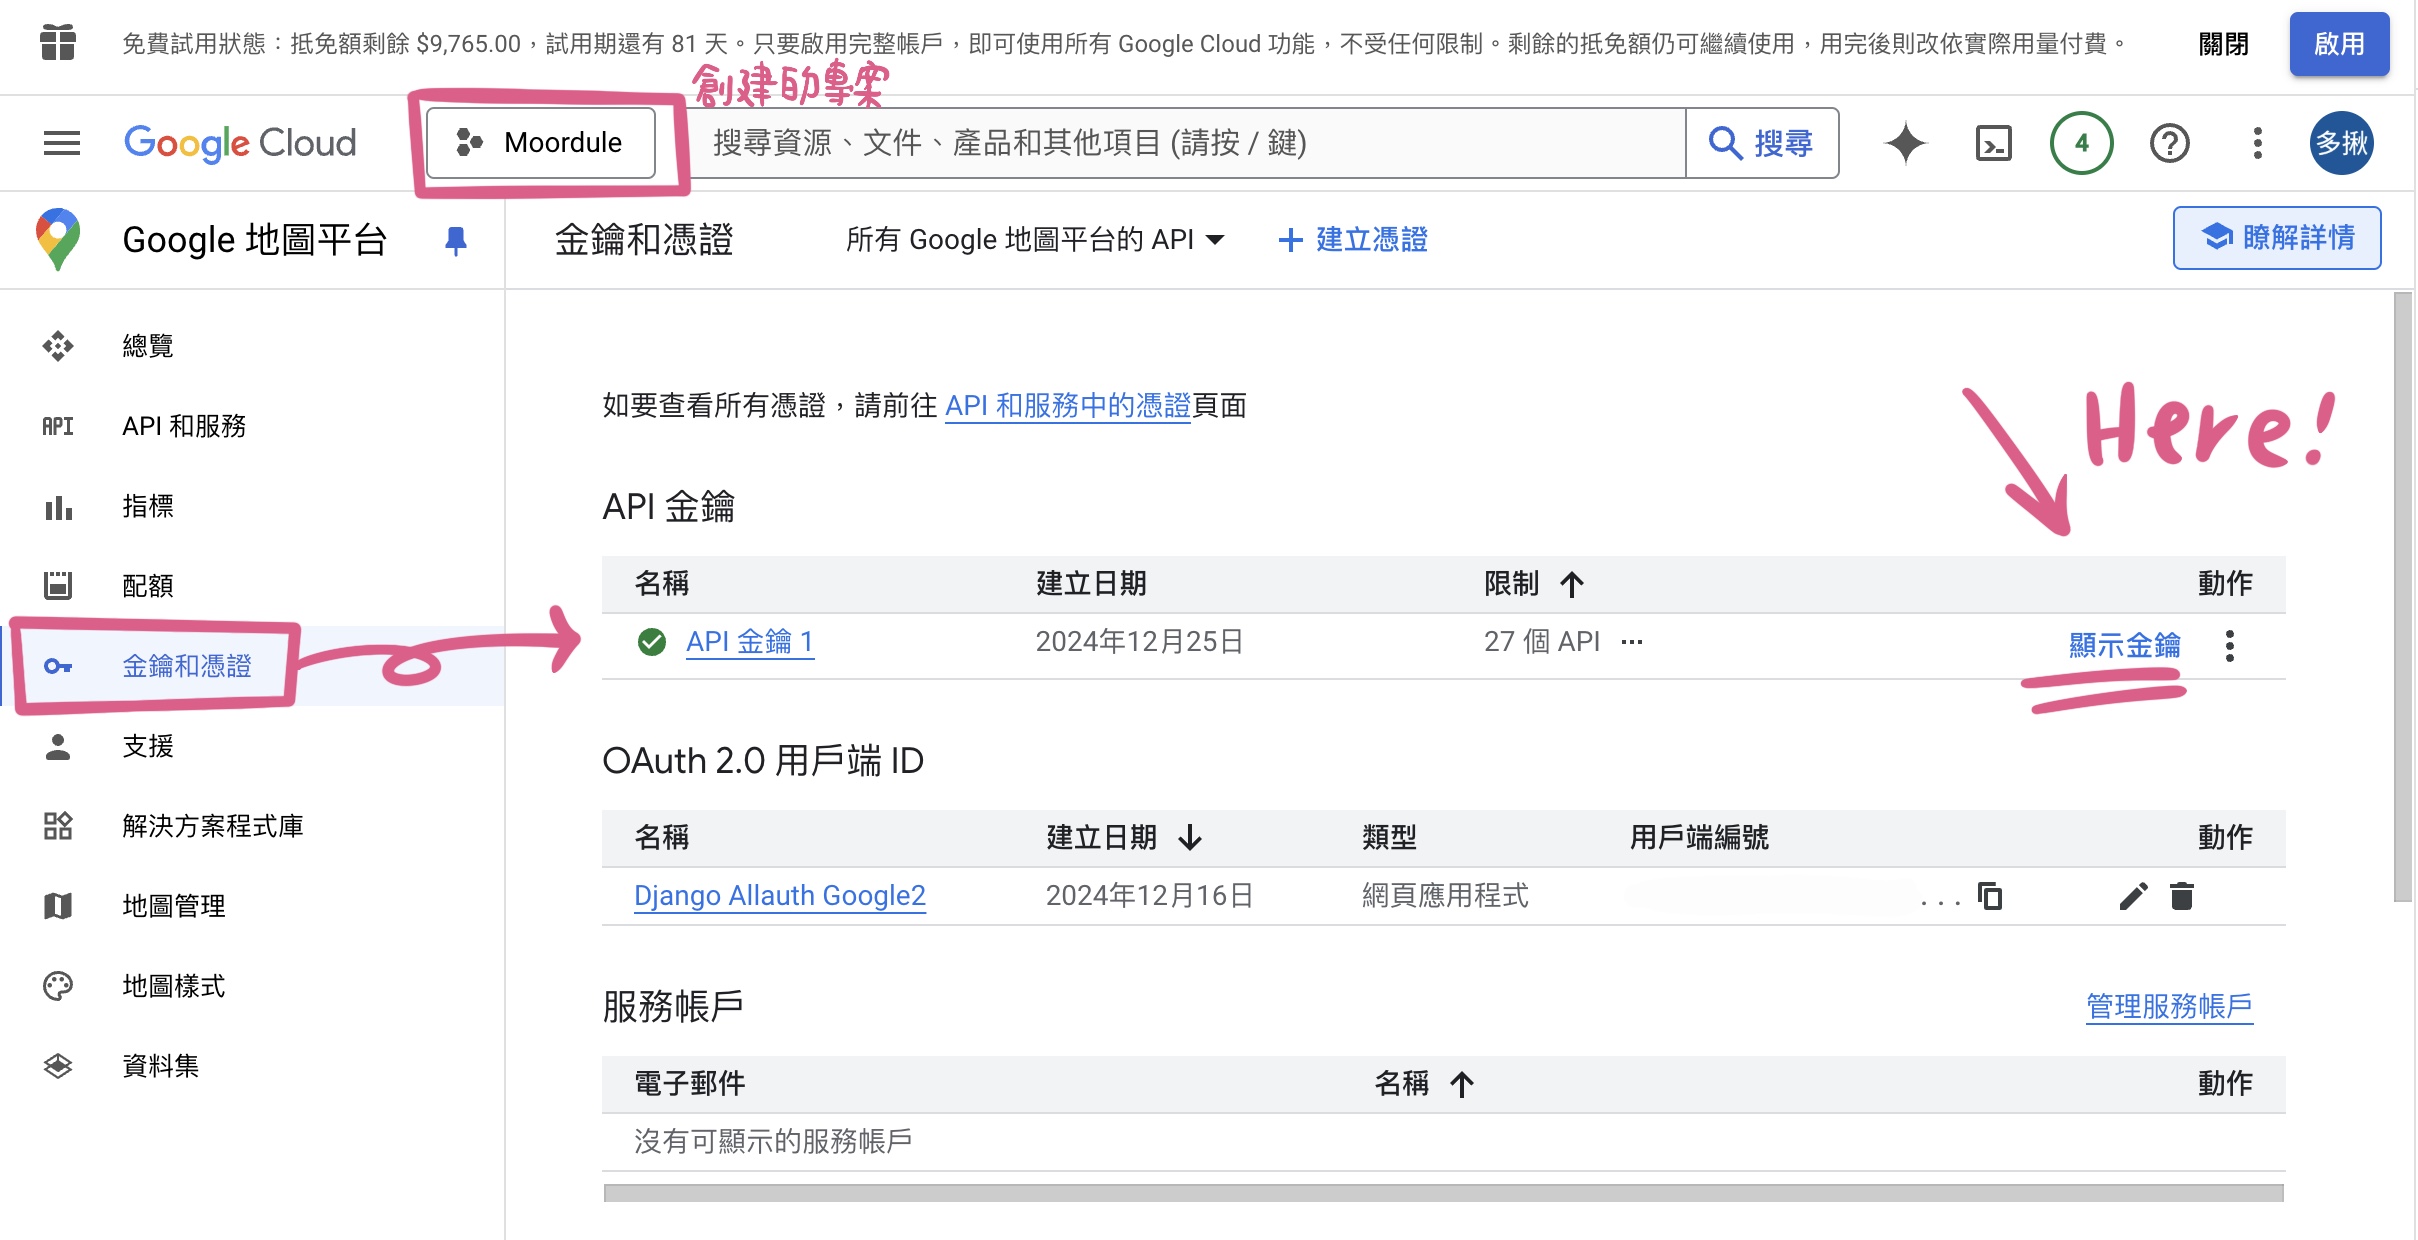
在這邊,將會使用到上面申請好的之後的API KEY,如果還沒複製的可以到這個頁面複製:
這個測試是確認API KEY 帶入後能成功渲染地圖出來,地圖的地址是固定的,如果不需要的可以跳過此步驟。
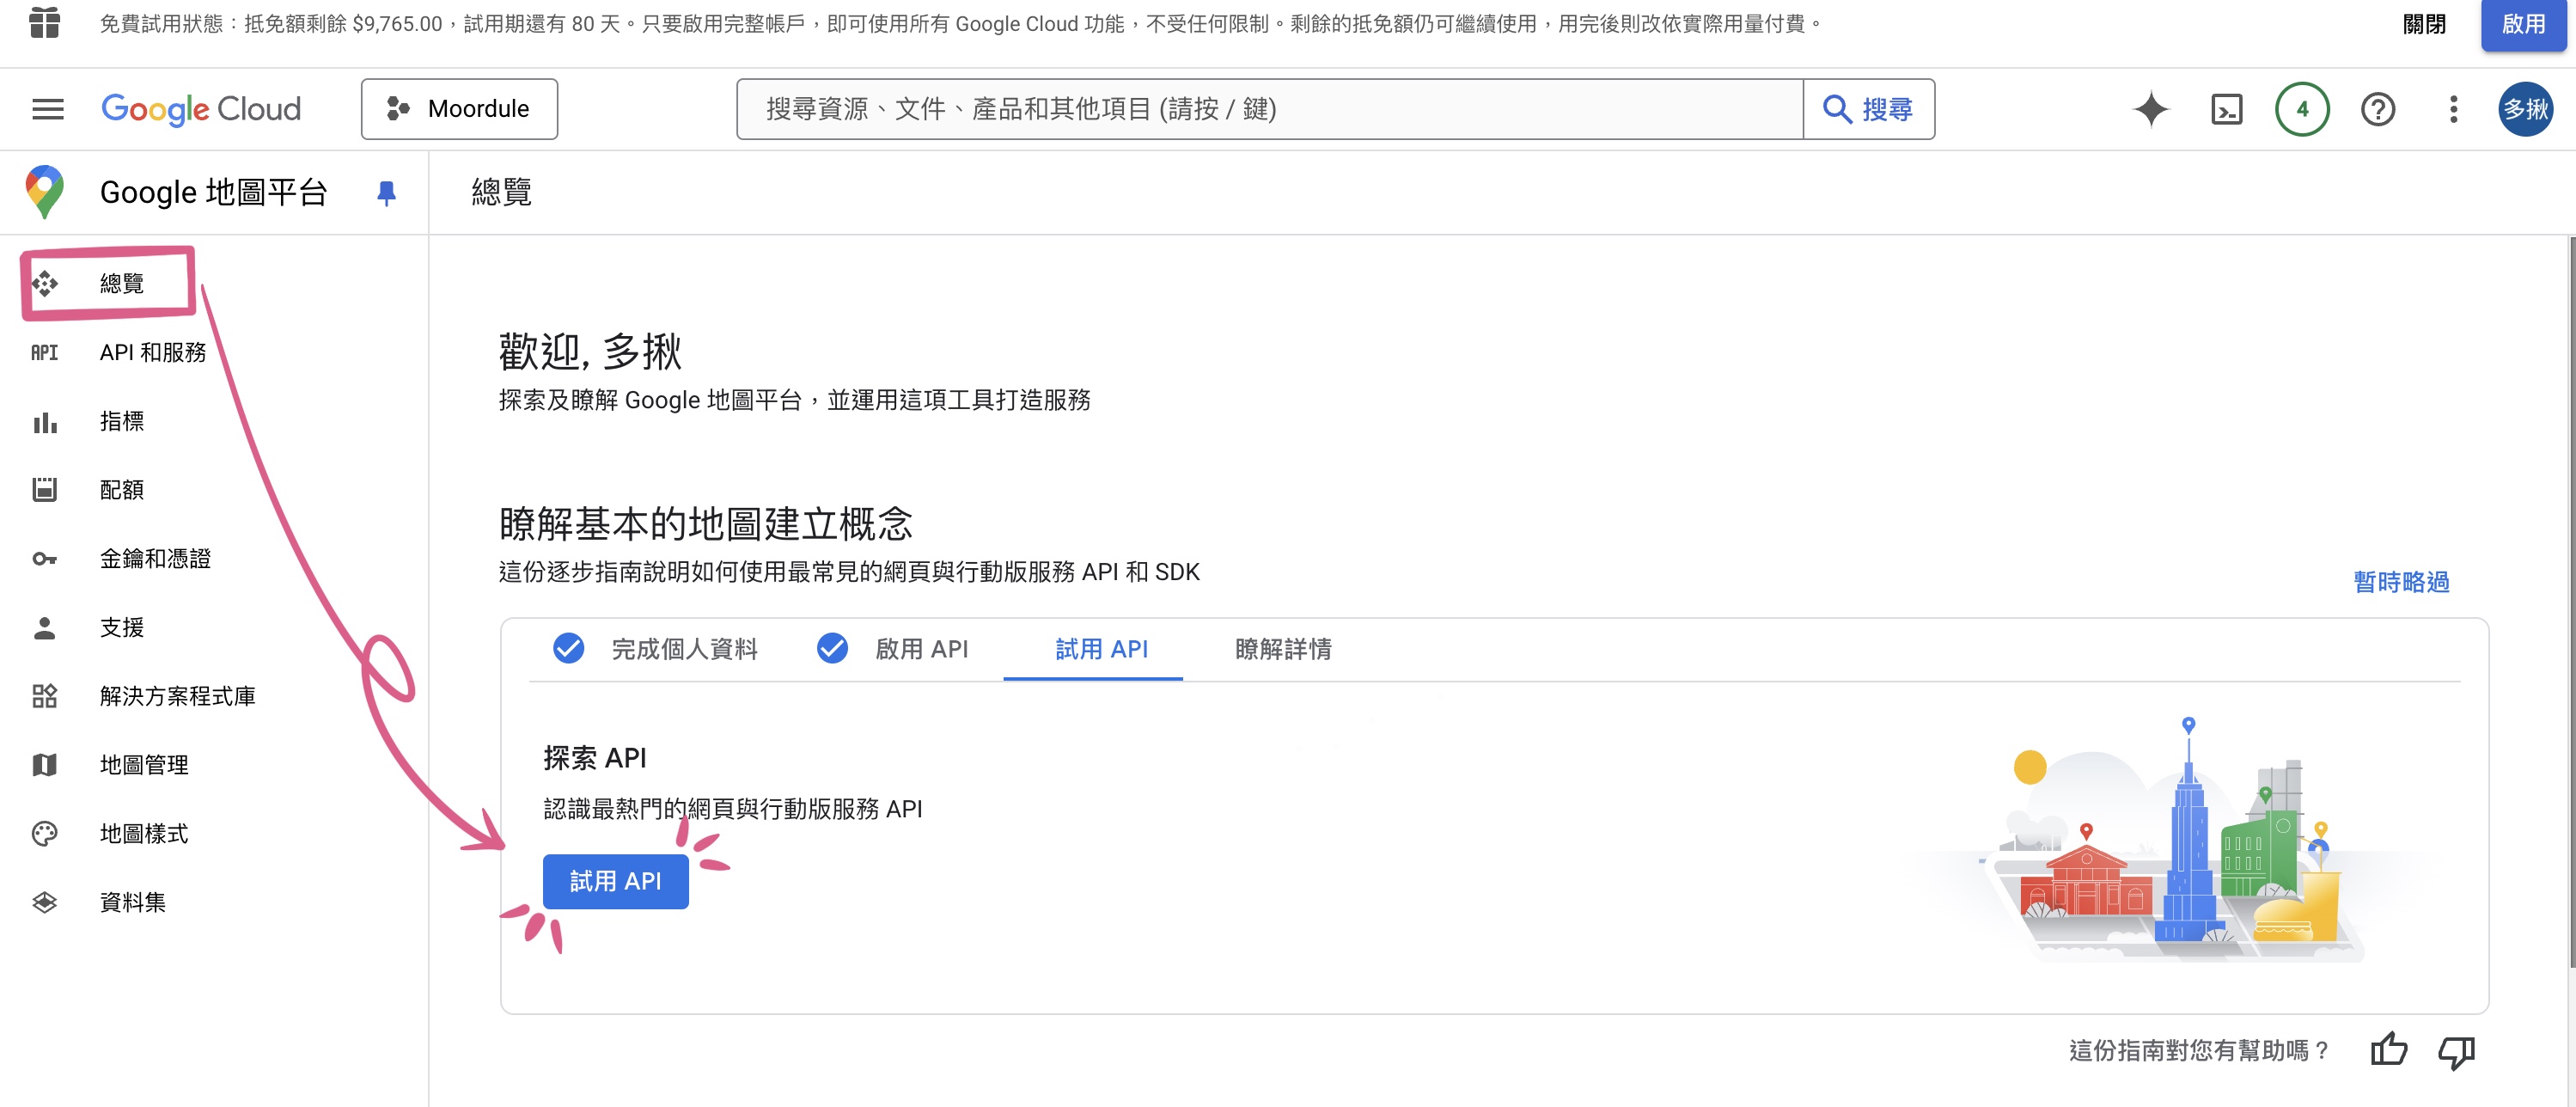
我們到頁面上的總覽,進去會出現試用API
會出現輸入地址的框,輸入一個地址,會出現輸入的位置地圖
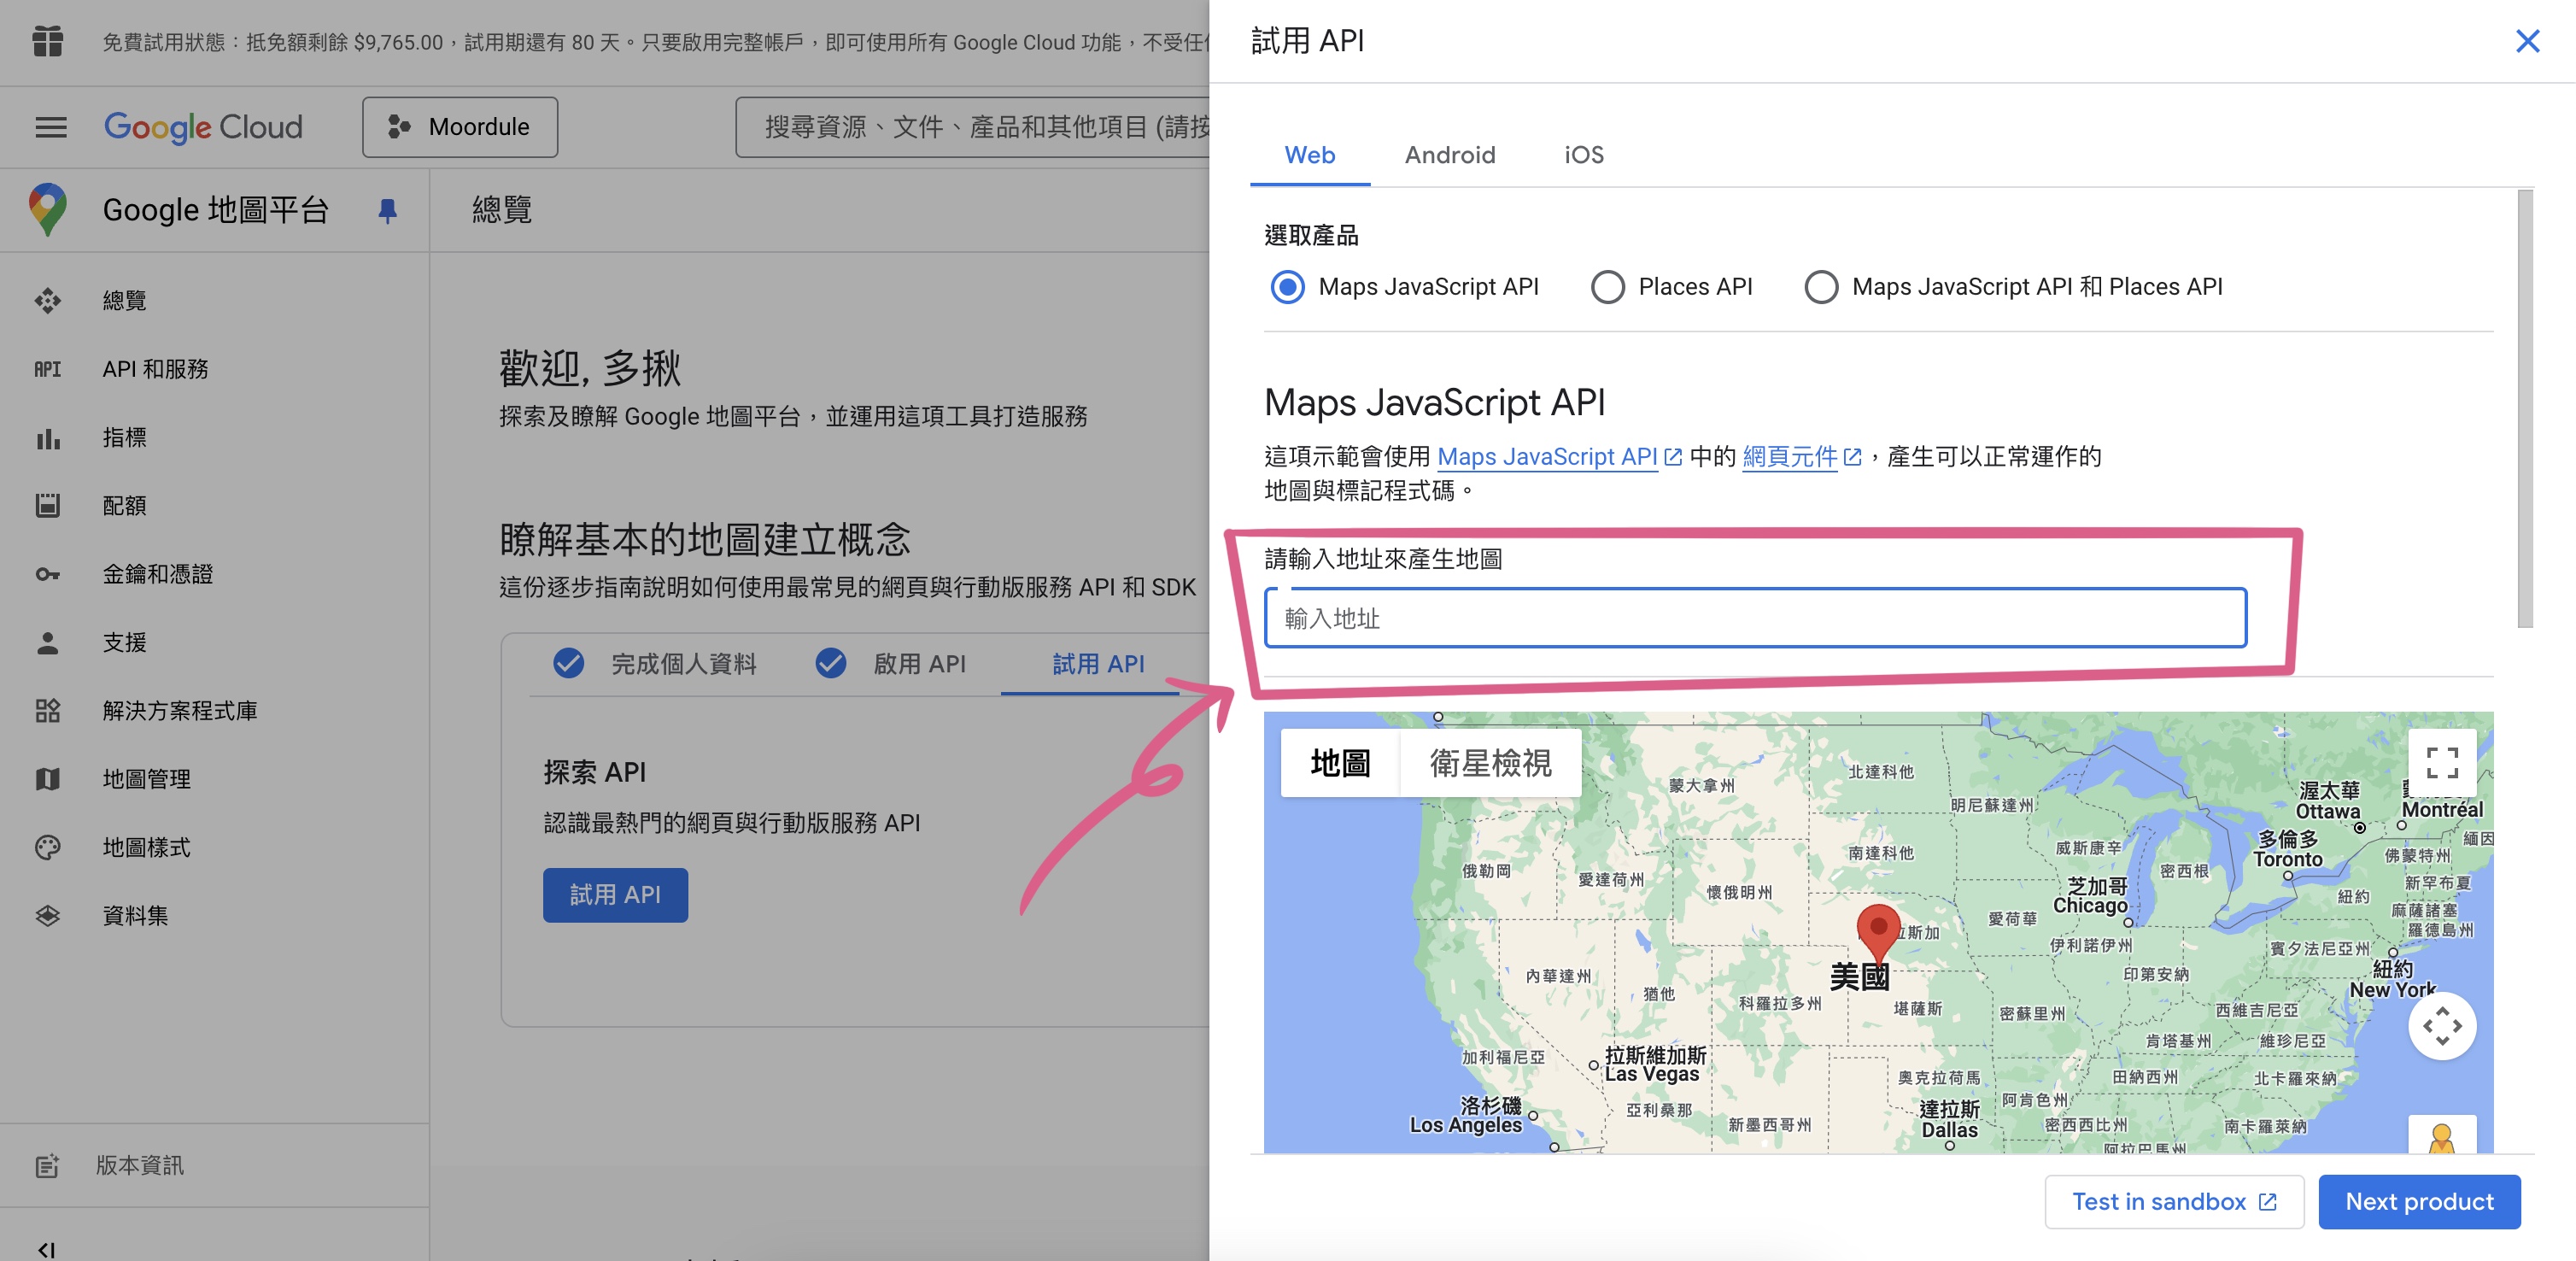
如果沒有直接顯示紅色地標📍,需要在地圖下方按確認。若確認位址下方就會出現程式碼標籤
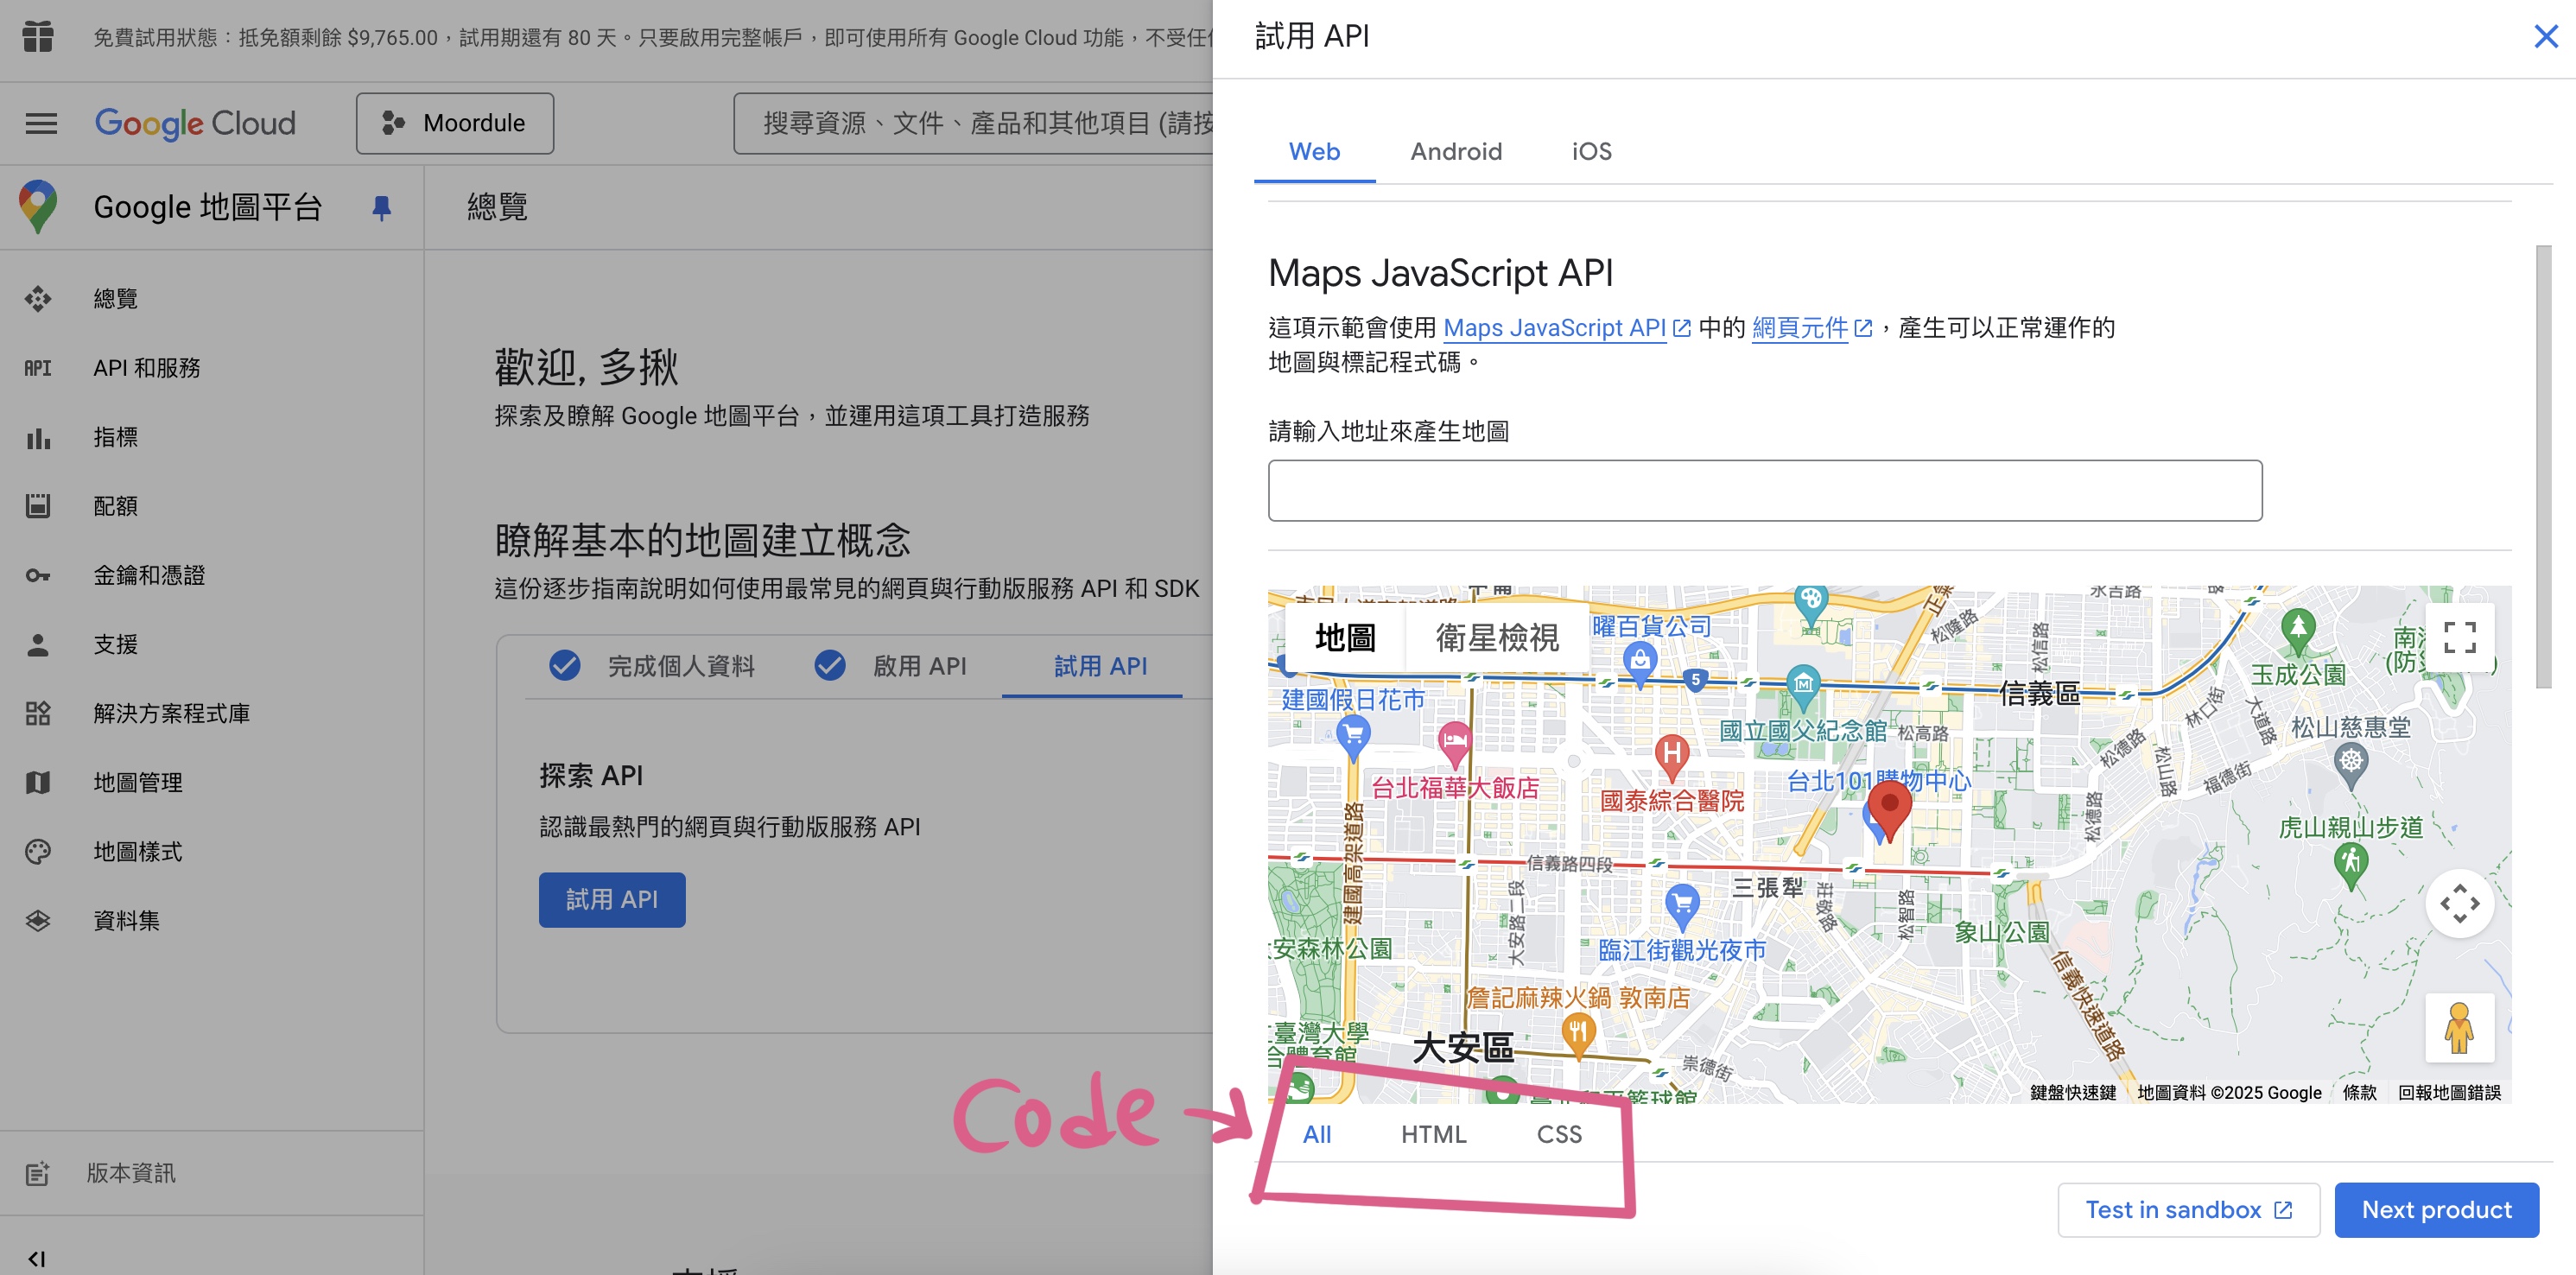
往下拉可以看到程式碼,必要放入的是三個箭頭指到的地方
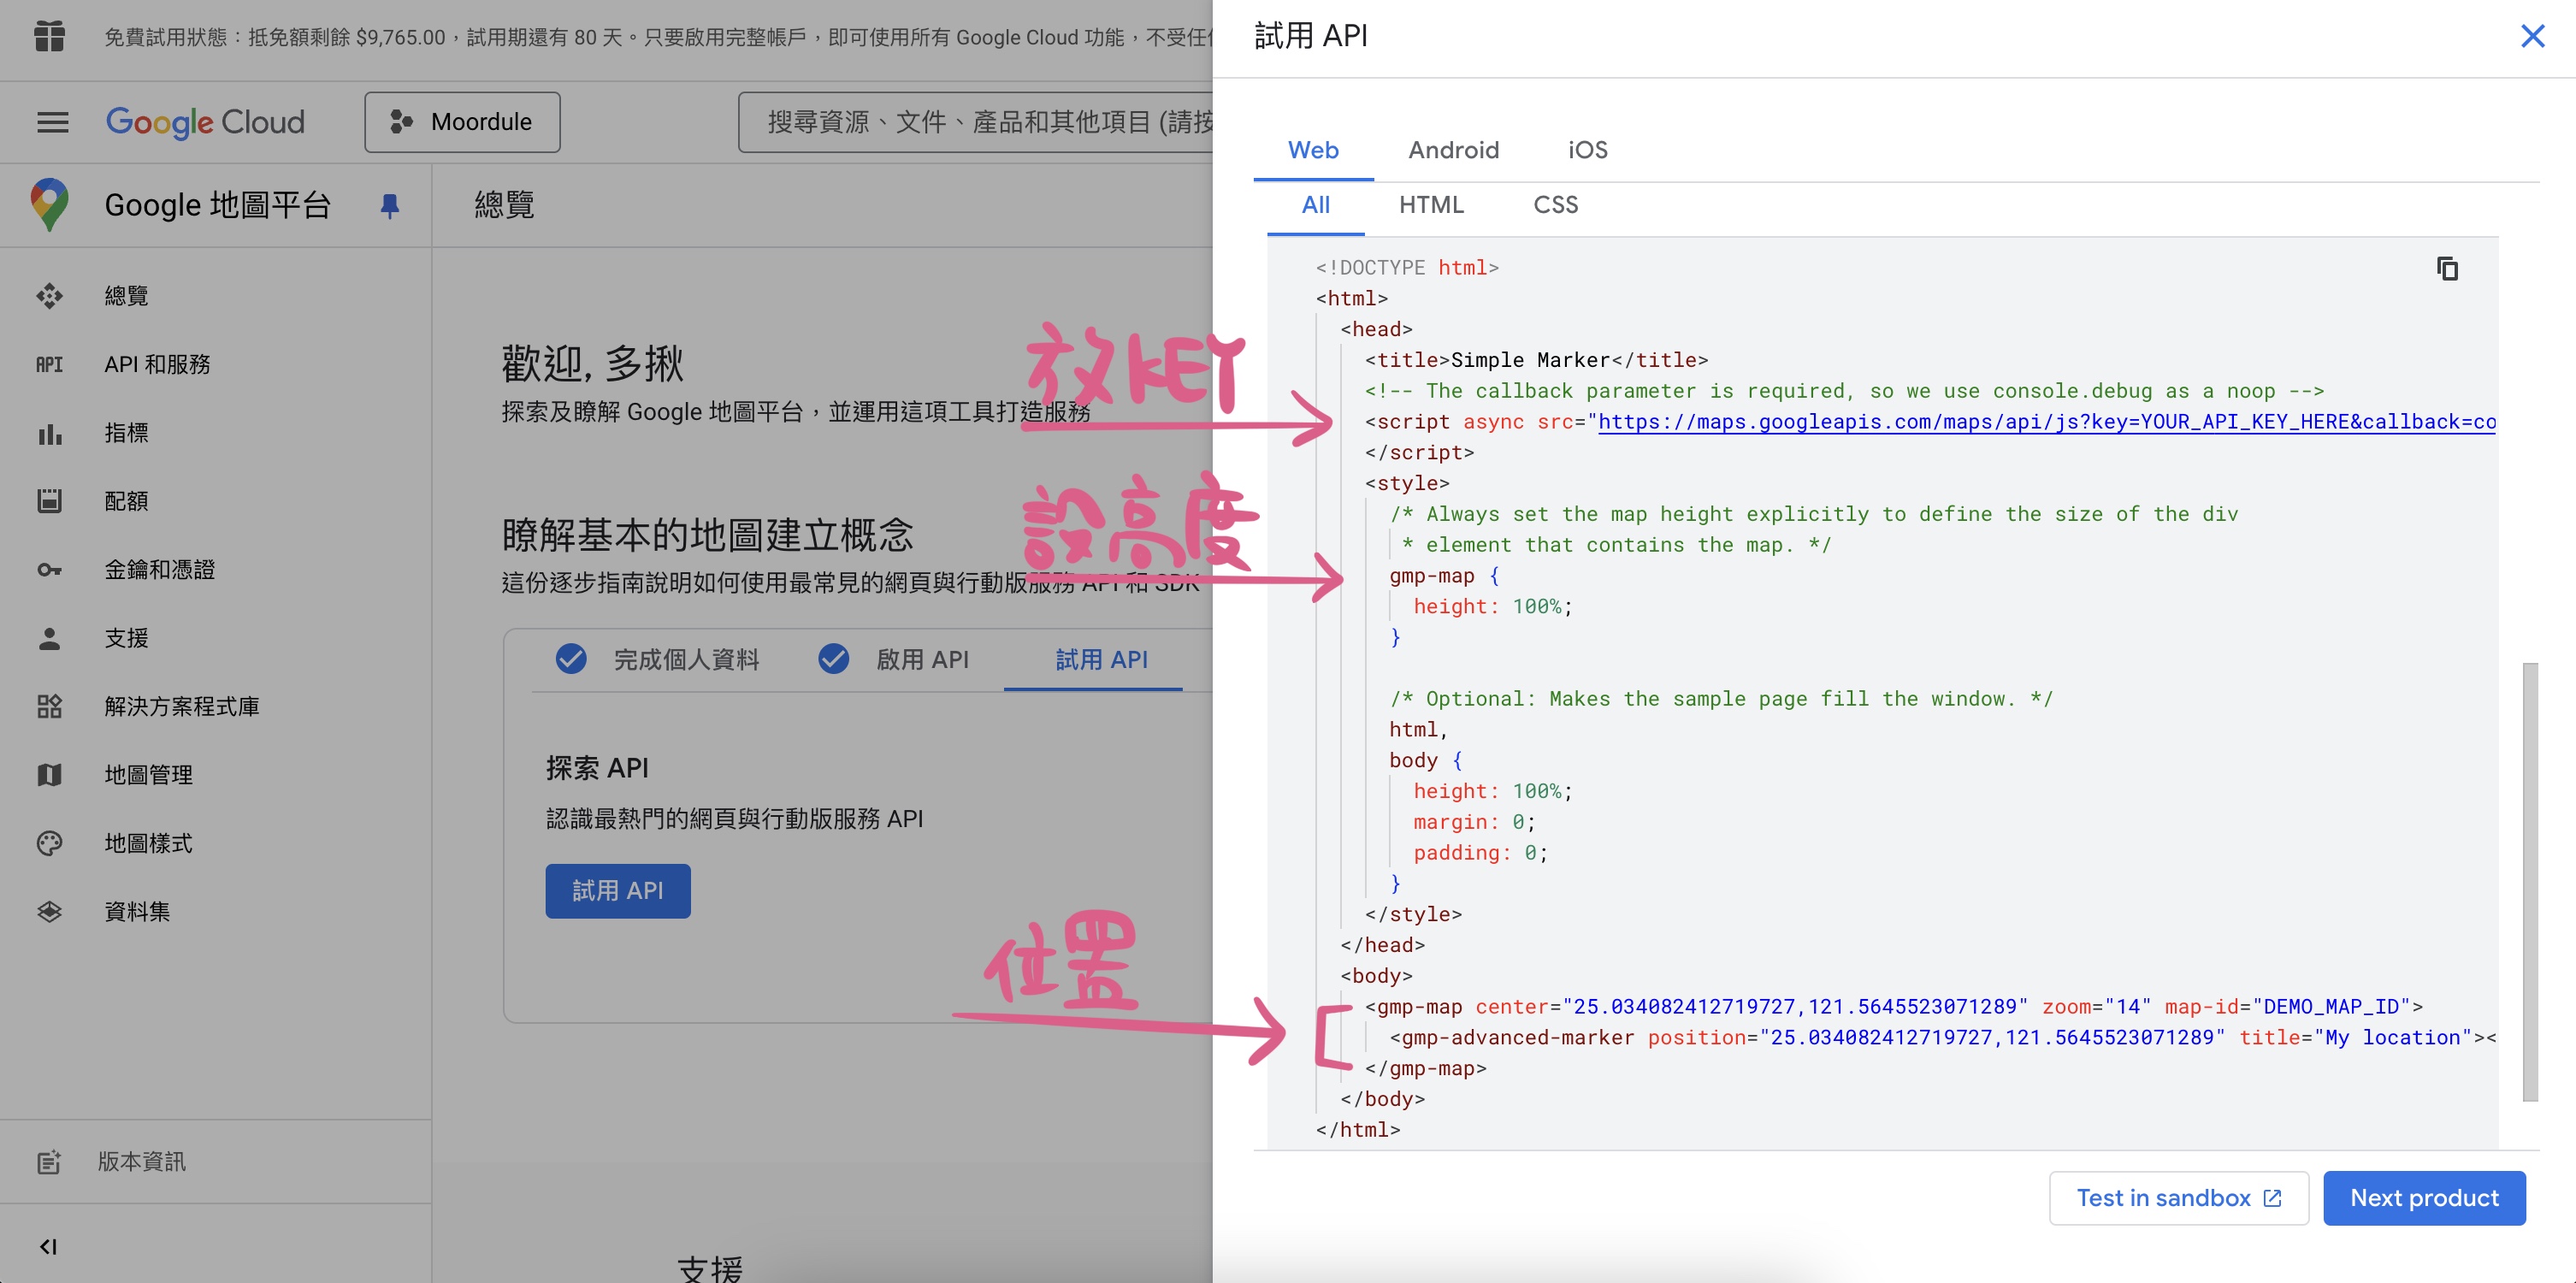
依照指示,將script中的YOUR_API_KEY_HERE替換成自己的API KEY
<script async src="https://maps.googleapis.com/maps/api/js?key=YOUR_API_KEY_HERE&callback=console.debug&libraries=maps,marker&v=beta">
</script>
將程式碼放入之後,就可以在頁面上看到地圖了
串接資料庫
小試牛刀之後,要來讓google map 可以顯示我們資料庫裡面的地址 會編輯到的檔案有:
- 環境變數-
settings、.env、.env.example - 功能設定-
models.py、views.py、urls.py、map.js、map.html
環境變數
先把重要的API KEY放入環境變數之中,避免後續操作時忘記拔掉,不小心將檔案傳到公開網域的話,後果可能會很嚴重的。
1.將API KEY放入.env
GOOGLE_MAPS_API_KEY= YOUR_KEY
2.在.env.example加入變數
GOOGLE_MAPS_API_KEY
3.在setting 導入環境變數
import os
from dotenv import load_dotenv

load_dotenv()
GOOGLE_MAPS_API_KEY = os.getenv("GOOGLE_MAPS_API_KEY")
功能設定
接下來進入正式的設定
1.首先在models.py中,需要有個欄位裝地址
from django.db import models

class Event(models.Model):
  title = models.CharField(max_length=100)
  address = models.CharField(max_length=255, help_text="聚會地址,例:台北市信義區市府路1號")

  def __str__(self):
        return self.title
2.views.py 設定功能
from django.shortcuts import render, get_object_or_404
from .models import Event

def event_detail(request, event_id):
    event = get_object_or_404(Event, id=event_id)
    google_maps_api_key = settings.GOOGLE_MAPS_API_KEY
    return render(request, 'information.html', {'event': event, 'google_maps_api_key': google_maps_api_key,})
3.掛上路徑url.py
from django.urls import path
from .views import event_detail

urlpatterns = [
    path('event/<int:event_id>/', event_detail, name='event_detail'),
]
4.在html置入。
在Django專案中的html使用jinja語法,重複的指令已拆出至layout.html
{% extends "base/layout.html" %}
{% load static %}
{% block head %}
    <script src="https://maps.googleapis.com/maps/api/js?key={{google_maps_api_key}}&callback=initMap&loading=async" async defer></script>
    <script src="{% static 'src/map.js' %}"></script>
{% endblock head %}

{% block content %}
  <h1>{{ event.title }}</h1>

  <div id="map" style="height: 300px; width: 100%;"></div>
  <input type="hidden" id="address" value="{{ activity.address|escapejs }}">
  </div>
{% endblock content %}
5.map.js做google map設定,讓地址能以map方式呈現:
window.initMap = function() {
    const address = document.getElementById('address').value;
    const geocoder = new google.maps.Geocoder();

    geocoder.geocode({ 'address': address }, function(results, status) {
        if (status === 'OK') {
            const map = new google.maps.Map(document.getElementById('map'), {
                zoom: 15,
                center: results[0].geometry.location
            });
            new google.maps.marker.AdvancedMarkerElement({
                position: results[0].geometry.location,
                map: map
            });
        } else {
            console.error('Geocode was not successful for the following reason: ' + status);
        }
    });
};
6.將map.js打包
在package.jason設定指令和打拋出去的檔案路徑
{
	"scripts": {
		"map": "esbuild ./src/script/map.js --bundle --outfile=static/src/map.js",
  }
}
執行打包
npm run map
7. main.js
由於專案一開始,設定了main.js,後面為管理方便,我將googls map需要設定js指令,另外開了檔案放置,但在實際執行時,網頁無法渲染出地圖的部分,進入網頁檢查>console發現錯誤訊息顯示,
在main.js裡initMap is not a function因此將map.js匯入 main.js
import initMap from './map';
initMap();
8.完成
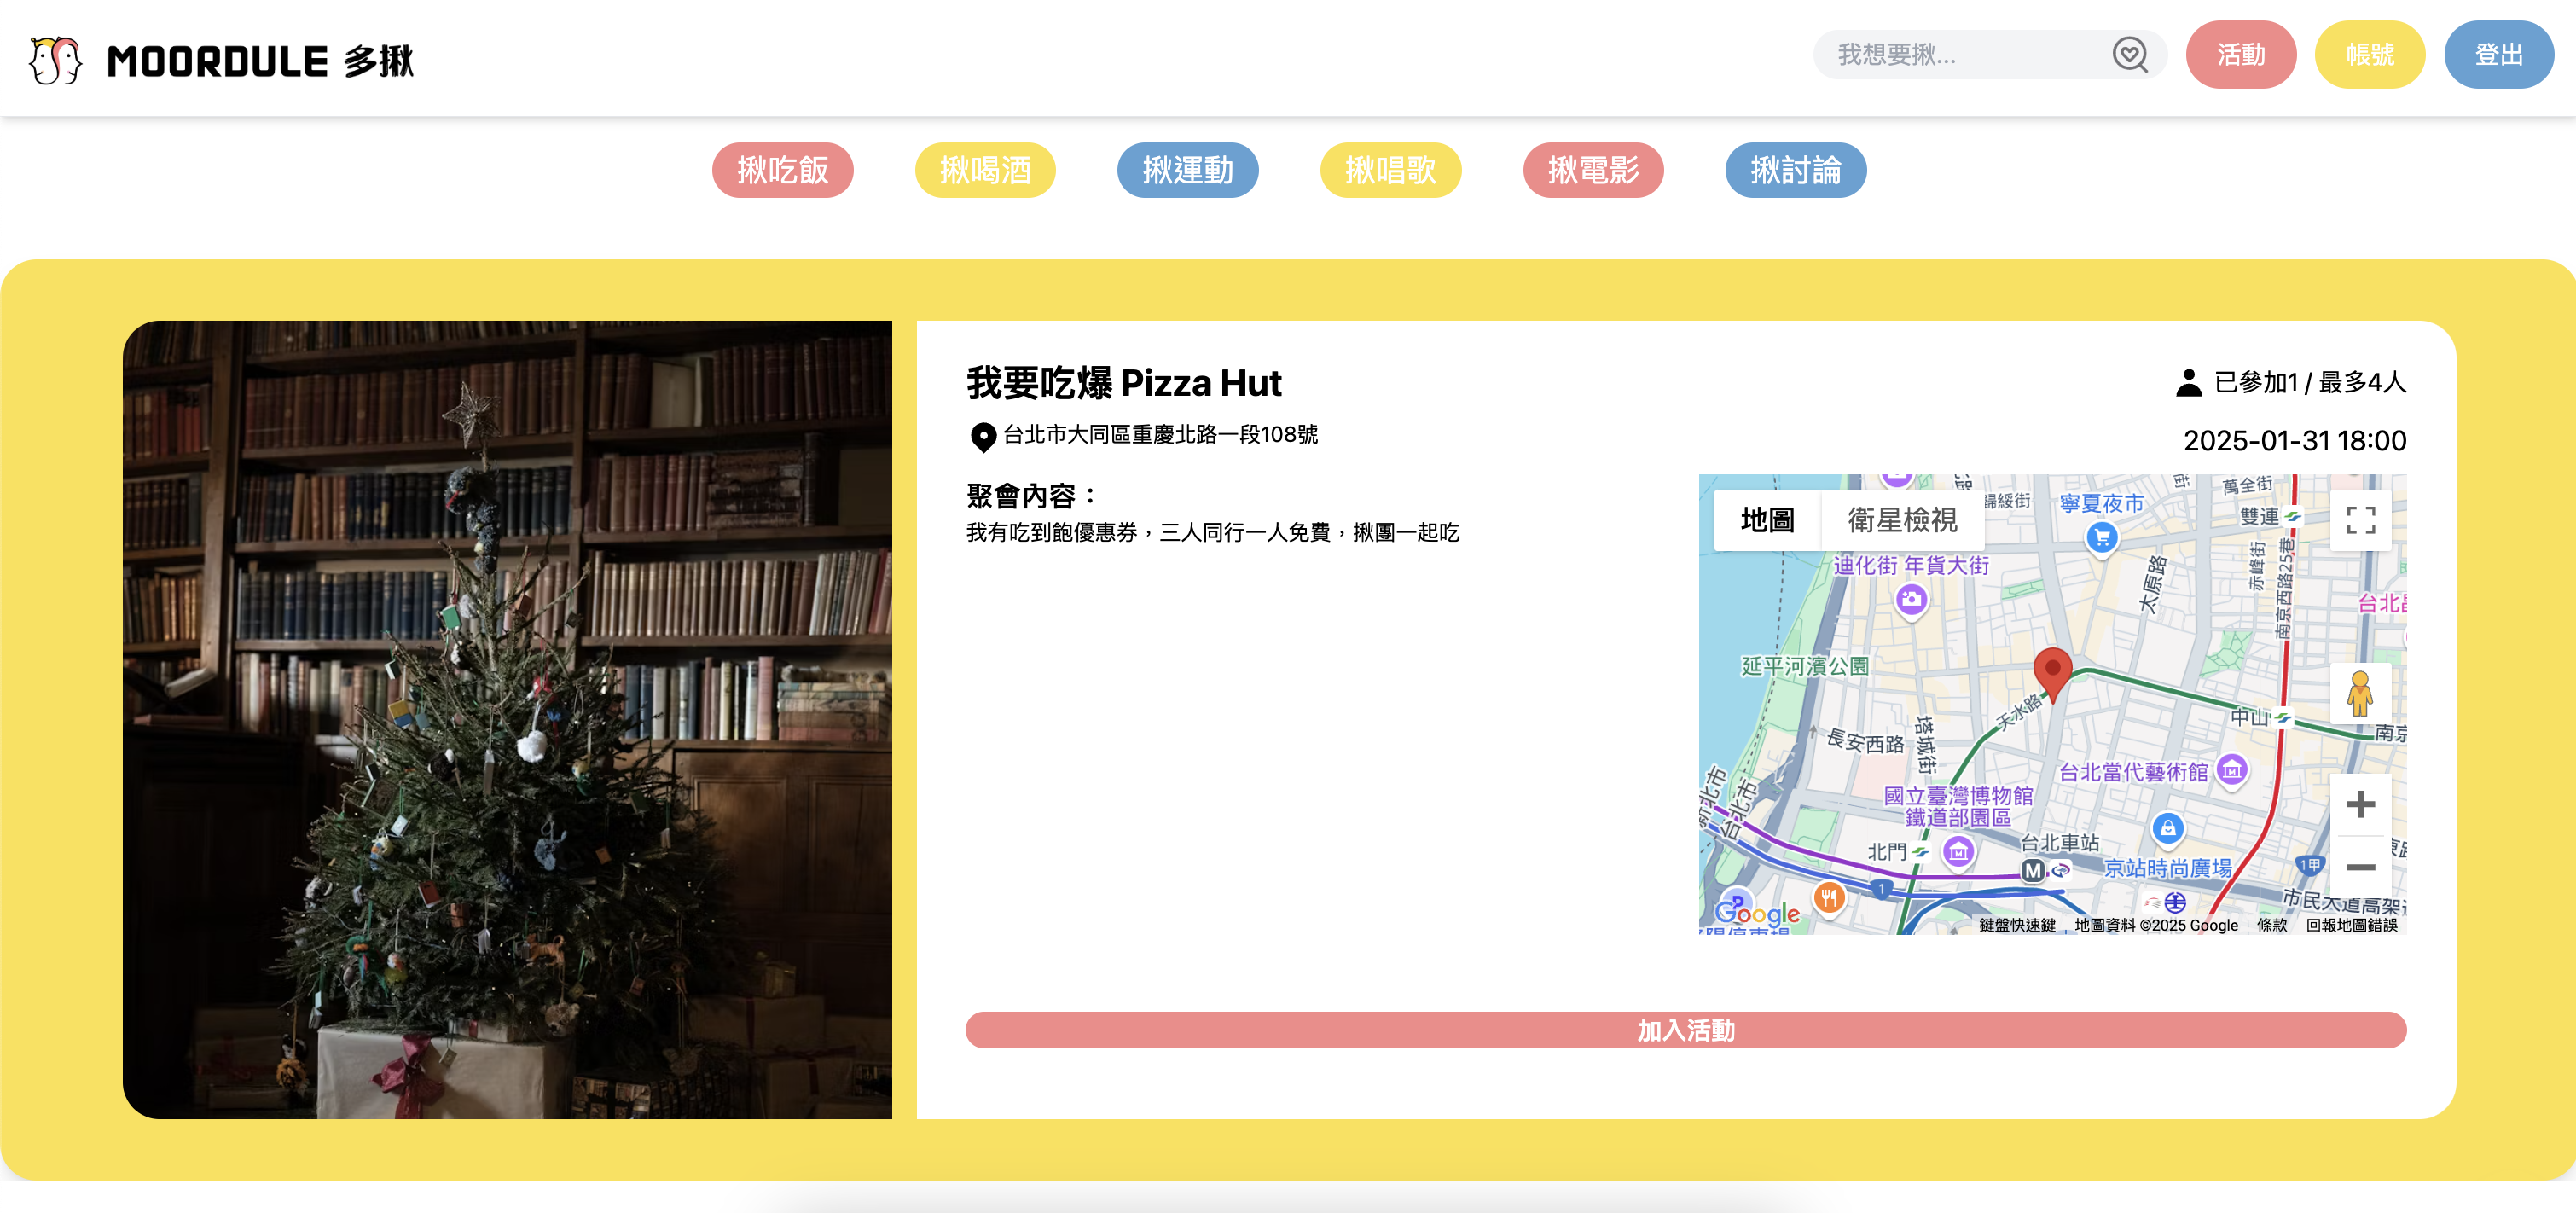
上面設定OK的話,就會在頁面看到地圖被渲染出來囉
而且還是資料庫裡面的地址呢,隨著每筆資料不同,也會跟著顯示對應的地圖。
如果目前資料庫裡面沒有資料,記得先去資料庫建立好資料之後,在回來測試。
額外功能
在找資料的時候,發現除了顯示地標之外,另有幾個功能可以提升UX,之後有時間實際操作,再把詳細的步驟放整理成文章放上來。
這邊就先列舉功能&參考影片
其他功能
- 顯示使用者目前位置
- 顯示線路(目前位置-目的地位置)
參考資源
Google map 功能串接介紹-1(英文)
Google map 功能串接介紹-2(英文)
Google map 功能串接介紹-3(英文)
Google map 功能串接介紹-4(英文)